Exploring Hobart: A Look at the Mt Wellington and MONA Tour
If you’re planning a visit to Hobart, Tasmania, and craving a well-rounded experience, the “kunanyi/Mt Wellington Tour and MONA Admission” package offers an enticing blend of natural beauty and cutting-edge art. This guided tour covers two of Hobart’s most talked-about attractions: the towering Mt Wellington with its dramatic vistas and ecosystems, and MONA (Museum of Old and New Art), a place that divides opinion but is undeniably a must-see for most visitors.
The tour’s biggest perks are its comprehensive itinerary, including transportation, guide insights, and entry tickets—all bundled together at a reasonable price of around $102 per person. On the flip side, the full-day schedule might feel a bit rushed, especially if weather conditions aren’t cooperative, which can impact the views and overall experience. It’s best suited for curious travelers eager to maximize their Hobart time with a mix of outdoor adventure and contemporary culture.
Key Points
- Stunning vistas from Mount Wellington are a highlight, especially if the weather cooperates.
- The guided commentary enhances understanding of Hobart’s ecosystems and history.
- Visiting Cascade Gardens offers a peaceful, historic spot with beautiful plants and a glimpse of the Cascades Female Factory ruins.
- MONA provides a unique art experience, with a mix of traditional artifacts and provocative contemporary works, accessible via ferry.
- The price includes ferry tickets and MONA entry, making it a good value for a full-day tour.
- Keep in mind the unpredictable weather on Mount Wellington and the shorter time at each stop if you want to see everything thoroughly.
You can also read our reviews of more tours and experiences in Hobart.

A Practical Guide to the Tour Itself
The Itinerary Breakdown
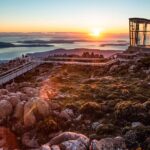
Stop 1: Mount Wellington
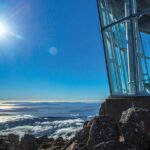
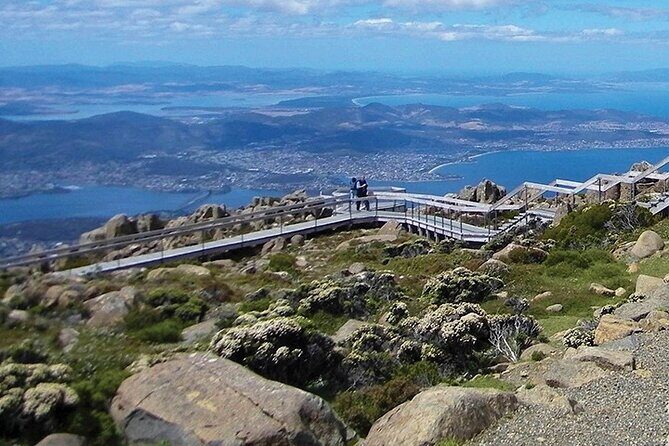
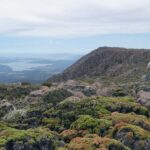
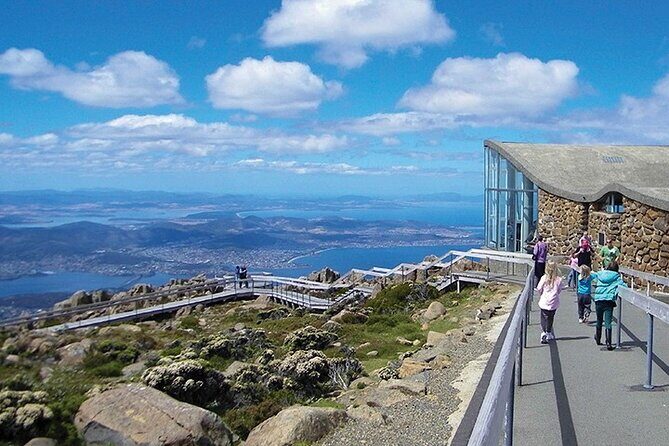
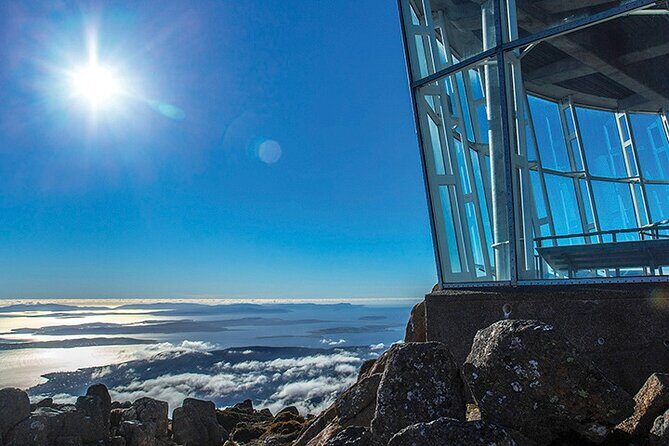
Your adventure begins with a scenic drive up to Mount Wellington. The ascent takes about 45 minutes, passing through diverse eco-systems and offering a chance to learn about the mountain’s unique environment from your guide. The highlight here is the Organ Pipes, a massive rock formation that’s both natural wonder and a geologist’s delight.
Expect stunning panoramic views from the summit—if the weather is clear. It’s worth noting, though, that Mount Wellington is famous for its capricious weather, which can turn cold, windy, or overcast without much warning. Several reviews mention how unexpectedly chilly and windy it gets, even in late spring or early summer. “Rug up, as you never know up there,” advises one traveler who was surprised by the icy hands and face.
The hour and fifteen minutes allocated here may only scratch the surface, but it’s enough to snap some photos and take a brief walk. For many, the experience of the mountain’s stark beauty is well worth the price of admission.
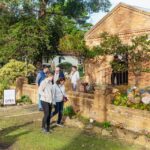
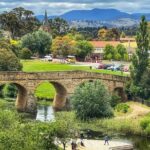
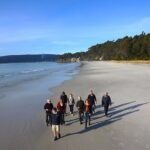
Stop 2: Cascade Gardens & Cascades Female Factory
Next is a visit to Cascade Gardens, a tranquil spot dating back to 1827. The gardens are picturesque and historically significant, especially since they sit near the remains of the Cascades Female Factory, a former female prison. Here, your guide will share snippets of stories about the women who once lived and worked there, adding a layer of human interest to the lush surroundings.
A quick 15-minute stop allows you to admire the gardens’ peaceful atmosphere and snap some photos of the historic remnants. Reviewers consistently mention the gardens as one of the most scenic and historically rich spots on the itinerary, with some noting the contrast between the beauty of the gardens and the stark history of the factory.
Stop 3: MONA (Museum of Old and New Art)
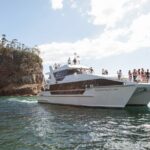
The centerpiece of the afternoon is MONA, a modern museum famed for both its architecture and its eclectic, sometimes controversial collection. Your journey from Hobart to MONA involves a scenic ferry ride along the Derwent River, giving you a chance to settle in and enjoy the views of the waterfront and the striking building as it emerges from the sandstone cliffs.
Once at MONA, you’ll spend about four hours exploring Australia’s largest private collection of art and artifacts. The exhibits range from ancient Egyptian mummies to provocative contemporary installations. Many visitors describe MONA as “strange,” “weird,” or “crazy,” but also undeniably fascinating.
One reviewer notes, “The architecture itself is worth the trip, carved out of the sandstone, and the experience inside can be both thought-provoking and entertaining.” Keep in mind, though, that some exhibits may be closed, and the digital guide system can be confusing, which might frustrate some visitors. The overall experience is subjective, but it’s generally regarded as a quirky, memorable visit.
Stop 4: Cascades Female Factory Historic Site
On the return journey, a brief outside view of the Cascades Female Factory offers additional context about the lives of convict women. Our driver/guide shares insights into their stories, making it an educational and emotional addition.
The Logistics and What It Means for You
Transport and Group Size: The tour uses an air-conditioned vehicle, with a maximum group size of 45 travelers. This size strikes a good balance—large enough for social interaction, but not so crowded that you feel lost or rushed.
Start and End Points: The tour kicks off at the Mona Brooke Ferry Terminal at 9:00 am, with the day wrapping up at Brooke Street Pier after the ferry ride from MONA. Note that hotel drop-offs are not included, so plan accordingly. The tour includes hotel pickup, which adds a lot of convenience.
Timing: With a 7.5-hour duration, the schedule is fairly packed. While this allows you to see a lot, it does mean some stops, especially MONA, might feel slightly hurried if you want to linger longer. The ferry ride is included, adding a scenic, relaxing touch to the day.
Cost and Value: At $101.85, the tour offers good value, considering it includes entry tickets for MONA, ferry transportation, and professional guiding. Many reviews praise the knowledgeable guides and well-organized itinerary for the price.
What Travelers Say: The Good and the Not-So-Good
Positives:
- Several reviews highlight the expert, engaging guides who provide informative commentary throughout the day.
- The views from Mount Wellington are frequently described as “stunning,” with many saying it’s “a must-do” when visiting Hobart.
- The ferry ride to MONA is often praised as “beautiful” and a relaxing way to reach the museum.
- The included tickets for MONA and ferry add value, especially for those who want a hassle-free experience.
Negatives:
- A few travelers mention the unpredictable weather at Mount Wellington, which can limit visibility or make the experience less enjoyable.
- Some found the schedule rushed, especially at the mountain and MONA, wishing for more time at each spot.
- A handful noted issues like the bus temperature not being adjustable or art exhibits not meeting expectations.
- The short time at each stop might leave those who want a deeper dive feeling a bit disappointed.
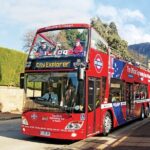
- Hobart: 24-Hour Hop-on Hop-off Sightseeing Bus Ticket
★ 4.5 · 739 reviews - Day Tour in Mt. Field, Mt. Wellington, Bonorong Wildlife Sanctuary and Richmond
★ 5.0 · 735 reviews - Hobart: Mt Wellington, Mt Field, Bonorong and Richmond Trip
★ 4.9 · 629 reviews - Maria Island Cruise and Guided Walk Day Tour With Lunch and Drinks
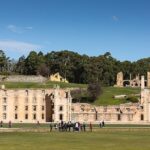
★ 5.0 · 617 reviews - Port Arthur Full-Day Guided Tour With Harbour Cruise and Tasman National Park
★ 4.5 · 585 reviews - Bruny Island Day Trip From Hobart
★ 4.7 · 579 reviews
When Would This Tour Suit You?
This experience is great for first-time visitors wanting a quick but rundown of Hobart’s highlights. If you’re a culture vulture and nature lover alike, you’ll appreciate the chance to see the mountain’s natural grandeur and the provocative art at MONA in one day.
However, if you prefer to spend more time at each attraction or have specific interests (like detailed art analysis or hiking on Mount Wellington), this tour may feel a bit rushed. Also, those with mobility issues should be aware of the quick stops and possibly uneven terrain at the mountain and gardens.
Final Thoughts on the Hobart Mountain and Art Trip
This tour offers a solid value for those eager to tick off Hobart’s signature sights without the hassle of planning every detail. The guided aspect enhances the experience, providing insights that you might miss exploring on your own. The ferry ride and included MONA entry make it a seamless, all-in-one package—no need to fuss about tickets or transportation logistics.
It’s especially appealing if you want an authentic taste of Tasmania’s wilderness and contemporary art scene in one day. The views from Mount Wellington are often breathtaking, and even if the weather isn’t perfect, there’s a certain beauty in the moody, cloud-shrouded landscape. Meanwhile, MONA’s eclectic collection guarantees conversation long after the visit ends.
In summary, this tour is best suited for curious, flexible travelers who appreciate guided insights, value a well-organized schedule, and are prepared for some variable weather. Perfect for those wanting a taste of Tasmania’s natural and cultural highlights in a single day—without the stress of navigation or ticketing.
FAQs
Is hotel pickup included?
Yes, the tour includes hotel pickup, making it convenient to start your day without worrying about transportation.
How long do we spend at each stop?
You’ll have about 1 hour 15 minutes at Mount Wellington, 15 minutes at Cascade Gardens, and around 4 hours exploring MONA, plus brief outside visits at the Cascades Female Factory.
What should I wear?
Dress warmly and in layers, especially for Mount Wellington, where the weather can change quickly and often gets cold and windy.
Does the tour include lunch?
No, lunch is not included, so plan to bring snacks or eat beforehand. You can also explore food options at MONA.
Will I have enough time at MONA?
Most travelers find four hours sufficient to see the highlights, but some mention the experience can feel rushed if you want to explore every exhibit.
What’s the benefit of the ferry ride?
The ferry offers a scenic, relaxing way to reach MONA, with beautiful views of the Derwent River and Hobart’s waterfront.
What if the weather is bad at Mount Wellington?
The tour is weather-dependent. If the weather is too poor for safe or enjoyable viewing, the tour might be canceled or rescheduled, with a full refund or alternative date offered.
To sum it up, whether you’re after postcard-perfect views, intriguing art, or a little of both, this Hobart day trip balances adventure and culture with impressive value. Just remember to dress appropriately for the mountain’s climate and keep your expectations flexible—sometimes the weather, like Tasmania itself, keeps us on our toes.